If you’re building a Ruby on Rails application and are in need of some forums functionality, you’ve most likely have looked into Beast. However, Beast is very limited in functionality (which I actually think is a good thing), so you might find yourself needing to extend Beast to do the things you want.
Fortunately, Beast has a plugin feature that will easily allow you to do this. In this post, I’ll cover how you would do this, using my StyleEditor plugin as an example.
The Plugin File Structure
First, let’s cover plugin file structure. This is what my StyleEditor plugin looks like:
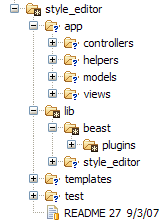
Here are the important points to note:
- app: The directory structure of this directory should follow the same conventions as the main Rails app/ directory. Code located in this directory follow the same class loading (and reloading) rules as the main app/ directory.
- lib/beast/plugins/style_editor.rb: This is the plugin class, where all the magic happens. The name of the file should be the tableized version of the plugin’s actual class name. The plugin class file must be located in beast/plugins, or else Rails will not be able to find it.
The Plugin Class
Here’s what’s the plugin class should look like:
1 2 3 4 5 6 7 8 9 10 11 12 13 14 15 16 17 18 19 20 21 22 23 24 25 26 | |
You can see what the final source looks like here. Here are some things to note about this class:
- The author, version, homepage, and notes methods provide some meta information for the plugin.
- The Dependencies.load_paths call will configure the sub-directories under app/ so that they’ll be dynamically loaded by Rail’s dependency resolution process.
- The ApplicationController.prepend_view_path call will prepend this plugin’s view path ahead of the normal Rails view path and any other view paths configured by other plugins loaded before it. This is important to remember if views aren’t being rendered like you’re expecting them to.
- Any changes to existing Rails or Beast controllers, models, etc. should go into initialize, in the form of monkey patches and mixins.
- Any installation tasks, such as file copy, should go into the install method.
Adding New Routes
I needed to create some new routes for my StylesController, so I used the route method of the Beast::Plugin class to install them:
1 2 | |
I’m using the RESTful syntax to creating routes here, but you can also use :connect and named routes as well.
Updating the Beast Schema
To update the Beast Schema, all I needed to do is to create a Schema class within the scope of your plugin class:
1 2 3 4 5 6 7 8 9 10 11 12 13 14 15 16 17 18 19 20 21 | |
The code in install/uninstall methods will work just like the up/down methods in a typical migration class. There is an issue where there’s no support for handling db changes overtime – hopefully someone will find a nice way to handle this (any takers?).
Using the Rails Console
At some point, you’ll want to do some quick tests to make sure your plugin changes are working as you expect them to, and try to test them from the console. If you have tried to this already, you’ll quickly find that your changes for some reason won’t work. Don’t fret, the reason why it doesn’t work is because the plugins aren’t initialize until the Dispatcher receives its first request. So, if you do want to test your changes in the console, you’ll need to run this command first:
1
| |
Installing a Plugin
Once you’re done with your plugin, you’ll need to install it. This step is pretty easy. First, install your beast plugins into vendor/beast, then run the plugin install method:
1
| |
Some plugins might have some additional installation instructions, so I would suggest looking at the README file (and if you’re developing on a plugin, make sure to put your install instructions in the README).
That’s It!
It’s important to note that Beast plugin system is an evolving system, and the steps I laid out here are what worked best for me through the process of trial an error. I’d love to hear what conclusions others have come to in their plugin development exploits. If you want to get a better feel of what an actual Beast plugin looks like, you can check out the plugins that I’ve developed at http://svn.codeeg.com/beast. If you want to see what those plugins look like in action, you can check them out on Boardista.com.